一、相关说明
- 搭建个人博客需要安装配置
Node.js、Git、Hexo - 博主本地环境:
Windows 11家庭中文版、64位操作系统,基于x64的处理器 - 我的个人博客:Zglao.github.io
二、Node.js
下载
官网路径
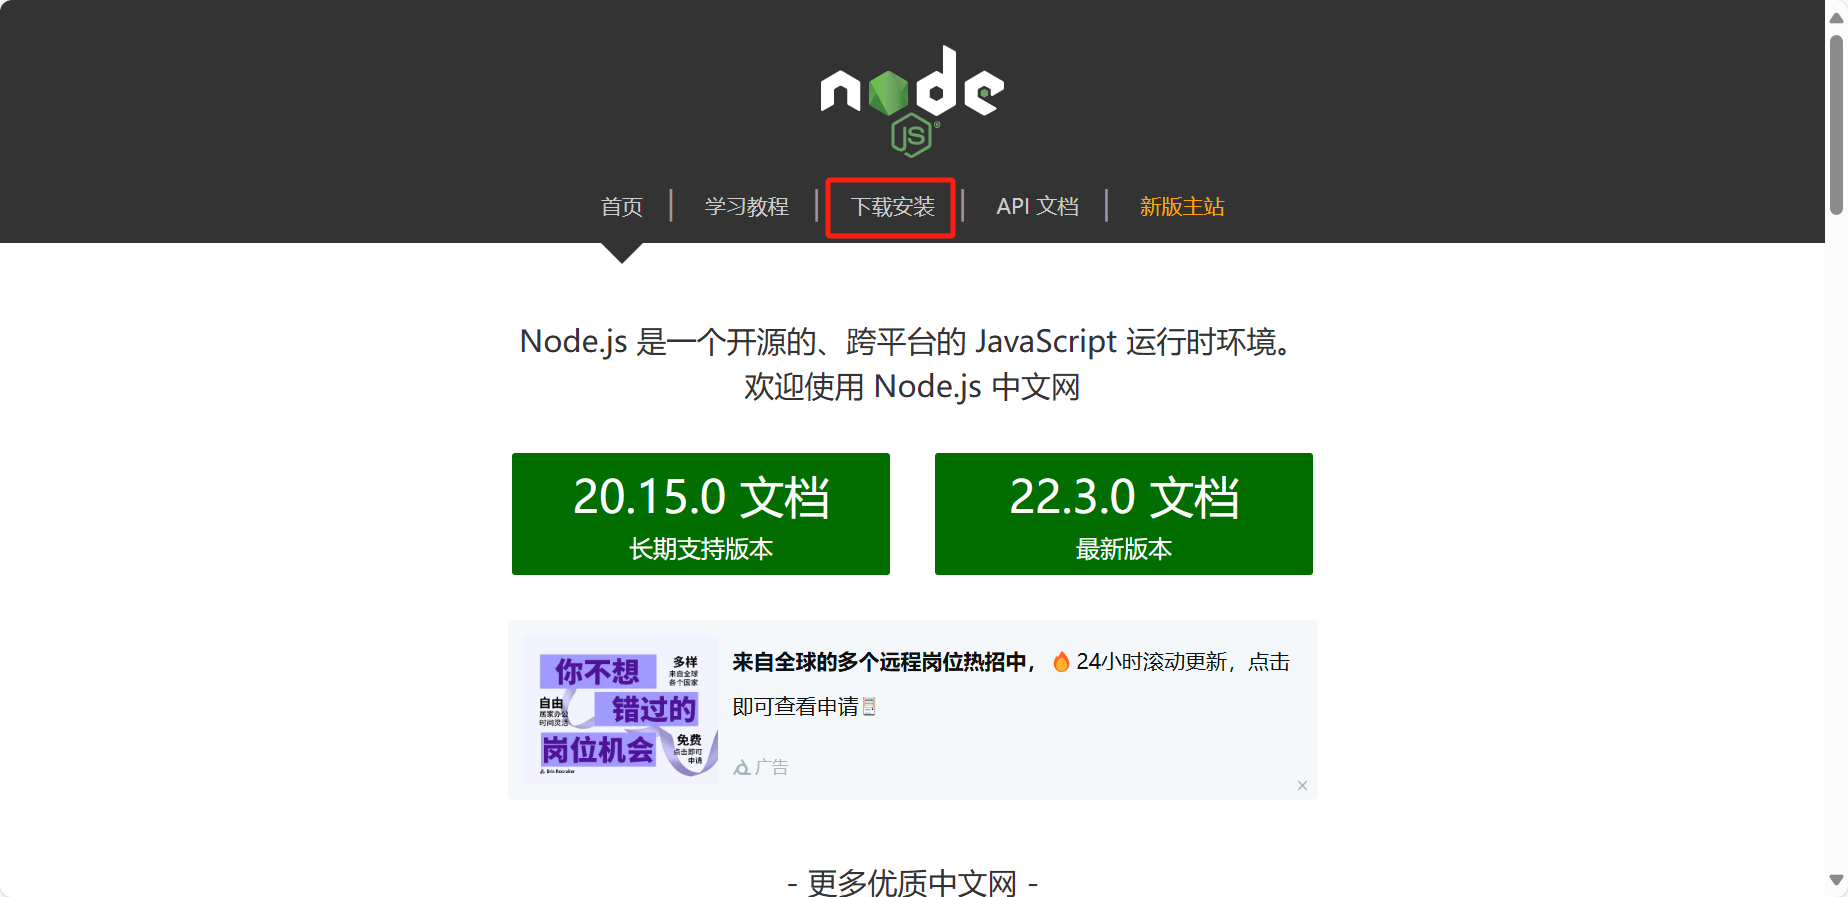
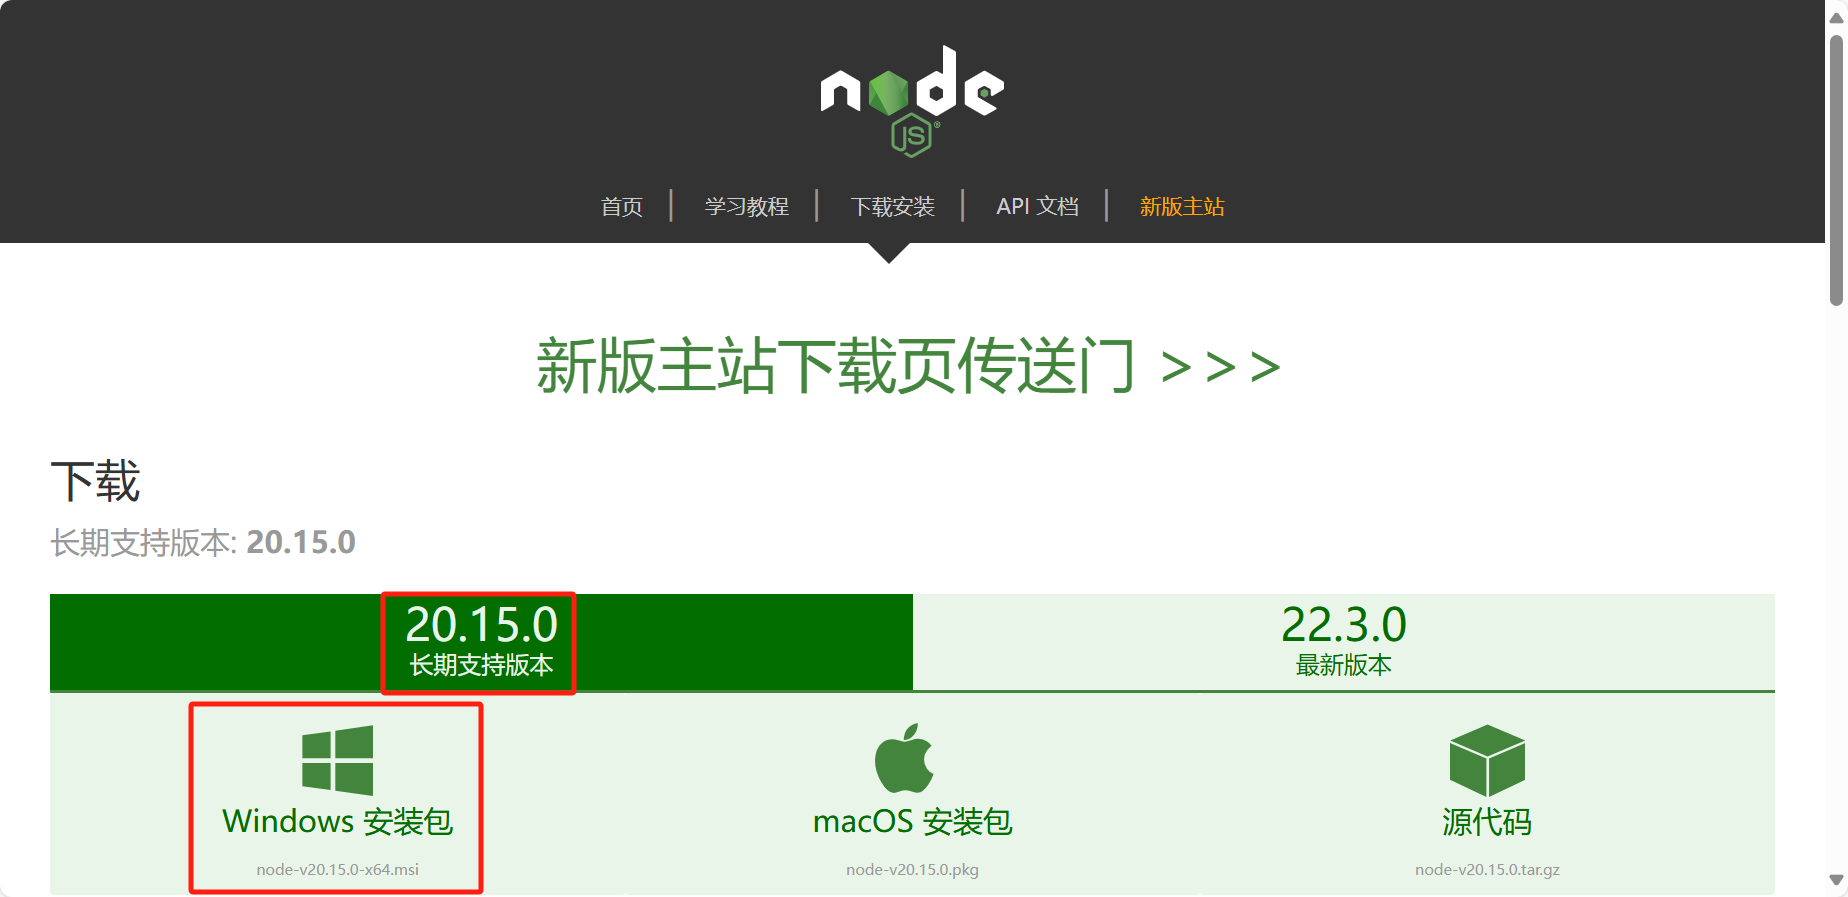
博主提供的下载链接(
Ctrl+单击自动跳转,需要登陆自己的Gitee账号)(https://gitee.com/zglao/InstallPackage/raw/master/Node-v20.15.0-x64.msi)
安装
修改安装路径即可,博主安装路径为
D:\nodejs,其他默认就可以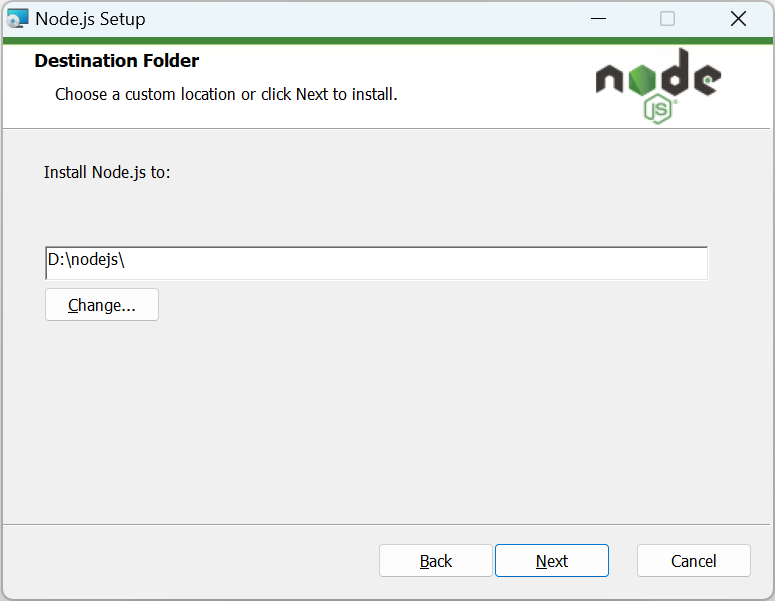
检查是否安装成功
打开终端(
Win+R键,输入cmd)或者终端管理员命令行页面,执行命令node -v、npm -v或者node --version、npm --version1
2
3
4
5C:\Users\20538>node -v
v20.15.0
C:\Users\20538>npm -v
10.7.0出现版本号,就证明安装成功
三、Git
下载
官网路径
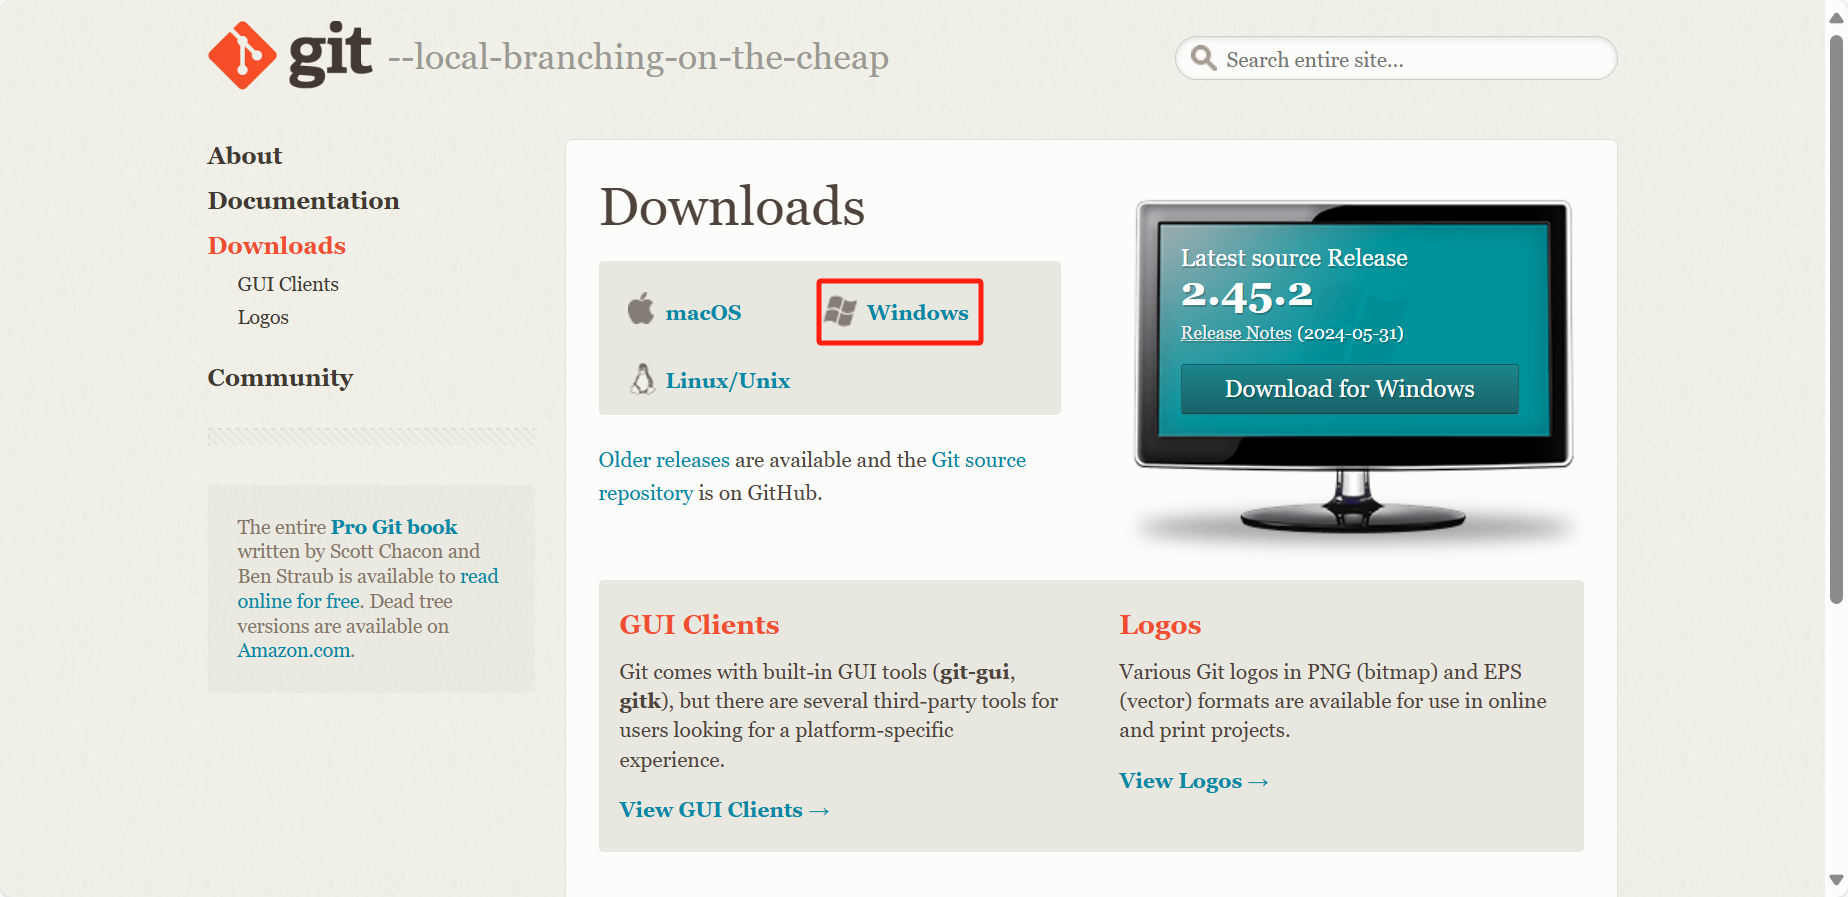
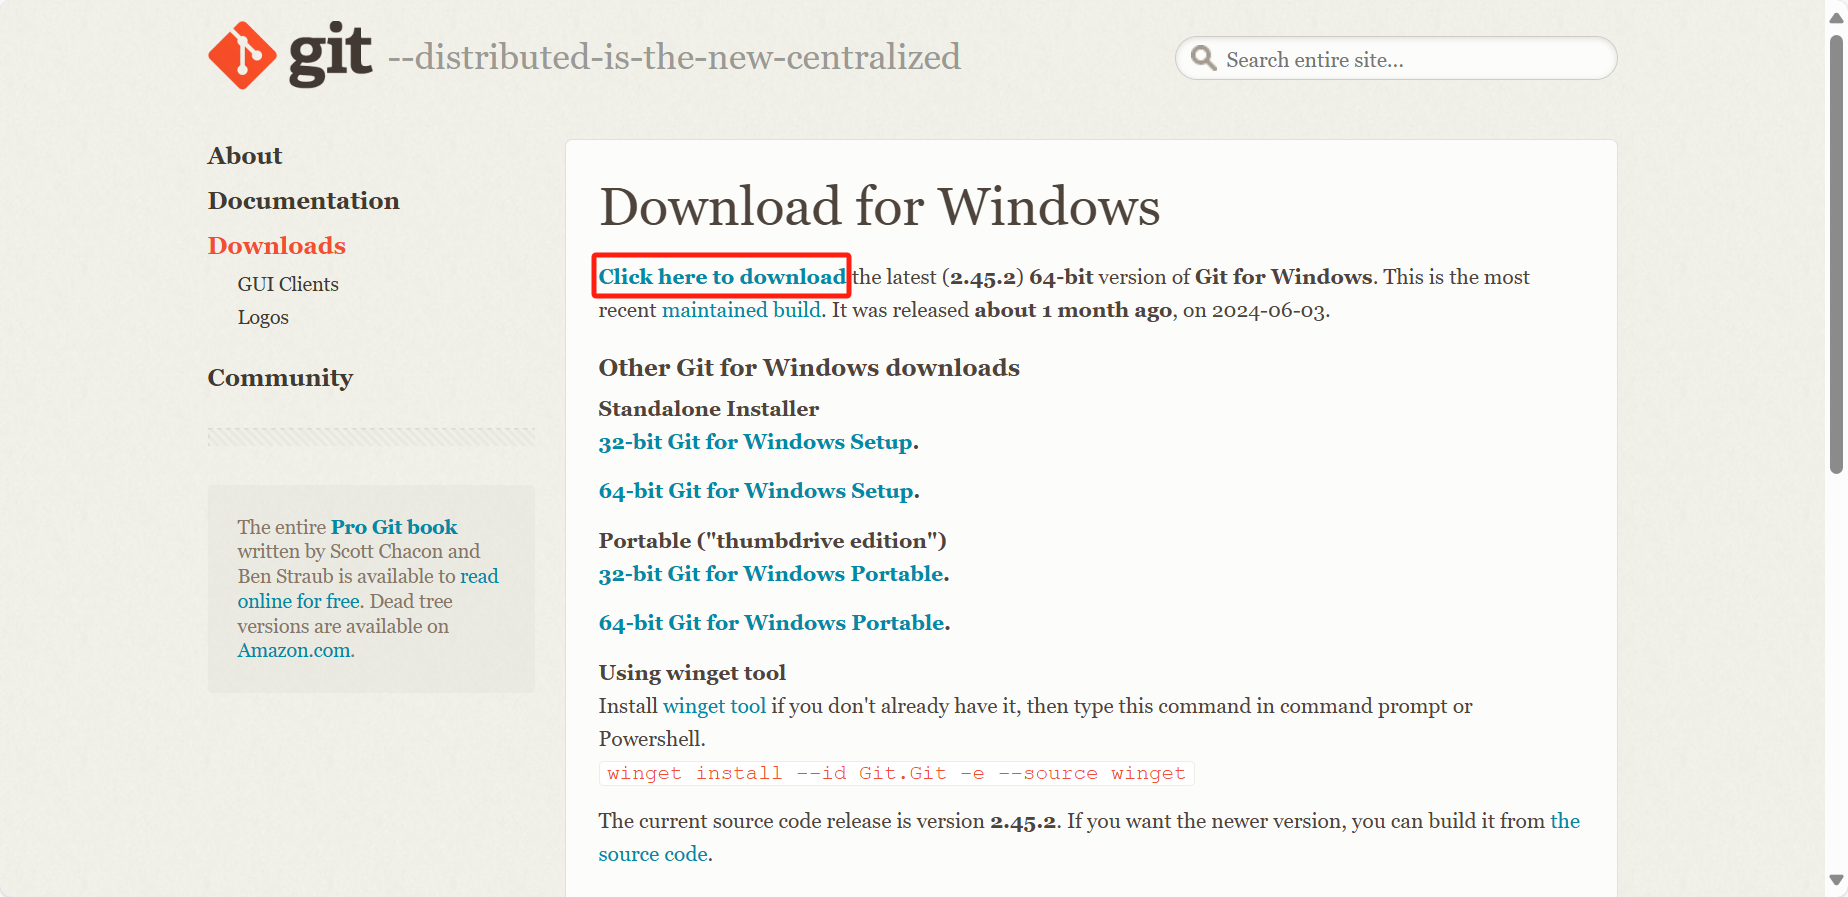
博主提供的下载链接(
Ctrl+单击自动跳转,需要登陆自己的Gitee账号)(https://gitee.com/zglao/InstallPackage/raw/master/Git-2.43.0-64-bit.exe)
安装
修改安装路径即可,博主安装路径为
D:\Git,其他默认就可以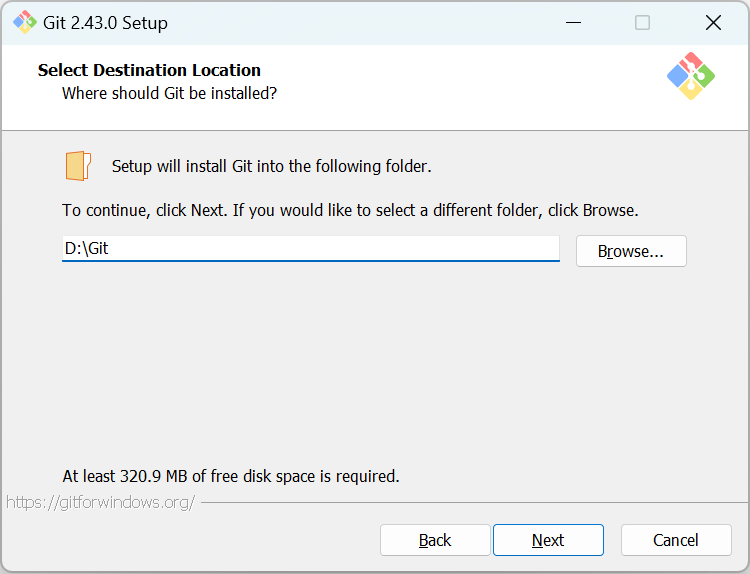
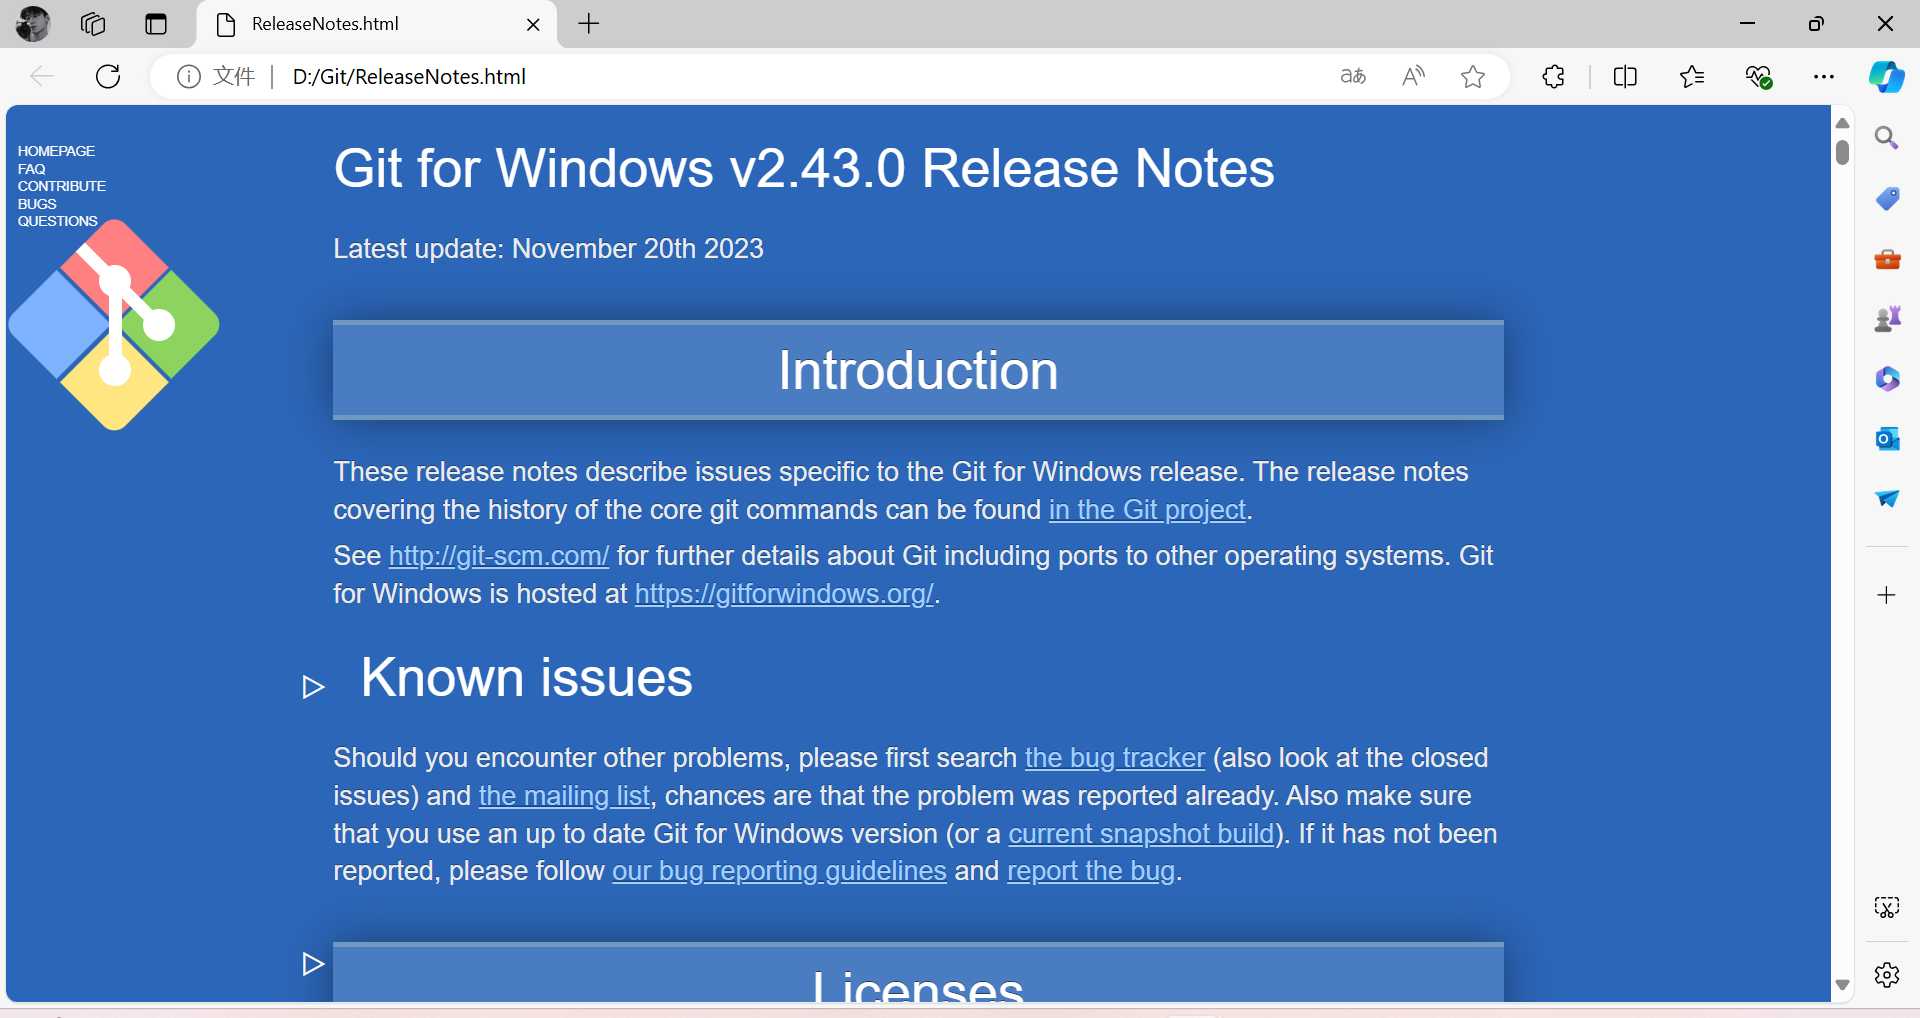
安装完成,关闭下载窗口,默认浏览器会自动打开版本发布说明
检查是否安装成功
桌面右键打开
Open Git Bash here终端命令行页面,执行命令git -v或者git --version1
2
3Zg Lao@admin MINGW64 ~/Desktop
$ git -v
git version 2.43.0.windows.1出现版本号,就证明安装成功
四、Hexo
安装
Hexo打开终端管理员命令行页面,执行命令
npm install -g hexo-cli,安装Hexo1
2
3
4
5
6
7
8
9
10
11PS C:\Users\20538> npm install -g hexo-cli
added 53 packages in 17s
14 packages are looking for funding
run `npm fund` for details
npm notice
npm notice New minor version of npm available! 10.7.0 -> 10.8.1
npm notice Changelog: https://github.com/npm/cli/releases/tag/v10.8.1
npm notice To update run: npm install -g npm@10.8.1
npm notice执行完后,路径
D:\nodejs下面会出现node_cache和node_global两个文件夹(也可能不会出现,不出现也不会影响之后的操作)若安装失败内容如下,更换
npm源重试1
2
3
4
5
6
7
8
9
10
11
12PS C:\Users\20538> npm install -g hexo-cli
npm error code ECONNRESET
npm error syscall read
npm error errno ECONNRESET
npm error network request to https://registry.npmjs.org/hexo-fs failed, reason: read ECONNRESET
npm error network This is a problem related to network connectivity.
npm error network In most cases you are behind a proxy or have bad network settings.
npm error network
npm error network If you are behind a proxy, please make sure that the
npm error network 'proxy' config is set properly. See: 'npm help config'
npm error A complete log of this run can be found in: C:\Users\20538\AppData\Local\npm-cache\_logs\2024-07-25T02_16_17_523Z-debug-0.log查看当前配置的
npm源1
2PS C:\Users\20538> npm config get registry
https://registry.npmjs.org/更换
npm源1
2
3PS C:\Users\20538> npm config set registry https://registry.npm.taobao.org/
# 或者
PS C:\Users\20538> npm config set registry https://registry.npmmirror.com/注释:
https://registry.npm.taobao.org/是淘宝npm镜像,https://registry.npmmirror.com/是搬瓦工提供的npm镜像清除
npm缓存1
2PS C:\Users\20538> npm cache clean --force
npm warn using --force Recommended protections disabled.清除
npm缓存确保新的配置生效验证
npm源是否更换1
2PS C:\Users\20538> npm config get registry
https://registry.npmmirror.com/更换成功会显示新配置的
npm源
检查是否安装成功
打开终端(
Win+R键,输入cmd)或者终端管理员命令行页面,执行命令hexo -v或者hexo --version1
2
3
4
5
6
7
8
9
10
11
12
13
14
15
16
17
18
19
20
21
22
23
24
25
26
27
28
29PS C:\Users\20538> hexo -v
INFO Validating config
hexo: 7.3.0
hexo-cli: 4.3.2
os: win32 10.0.22631 undefined
node: 20.15.0
acorn: 8.11.3
ada: 2.7.8
ares: 1.28.1
base64: 0.5.2
brotli: 1.1.0
cjs_module_lexer: 1.2.2
cldr: 45.0
icu: 75.1
llhttp: 8.1.2
modules: 115
napi: 9
nghttp2: 1.61.0
nghttp3: 0.7.0
ngtcp2: 1.1.0
openssl: 3.0.13+quic
simdutf: 5.2.8
tz: 2024a
undici: 6.13.0
unicode: 15.1
uv: 1.46.0
uvwasi: 0.0.21
v8: 11.3.244.8-node.23
zlib: 1.3.0.1-motley-7d77fb7出现版本号,就证明安装成功
初始化
Hexo创建文件夹,命名为
Blog(文件夹命名,MyBlog、Personal Blog等都可以),博主文件夹路径为D:\Blog,打开终端管理员命令行页面,进入D:\Blog路径,执行命令hexo init,初始化Hexo1
2
3
4
5PS C:\Users\20538> cd D:\Blog
PS D:\Blog> hexo init
INFO Cloning hexo-starter https://github.com/hexojs/hexo-starter.git
INFO Install dependencies
INFO Start blogging with Hexo!启动
Hexo打开终端管理员命令行页面,进入
D:\Blog路径,执行命令hexo s或者hexo server,启动Hexo1
2
3
4PS D:\Blog> hexo s
INFO Validating config
INFO Start processing
INFO Hexo is running at http://localhost:4000/ . Press Ctrl+C to stop.Ctrl+单击(链接http://localhost:4000/)自动跳转默认浏览器访问,Ctrl+C停止运行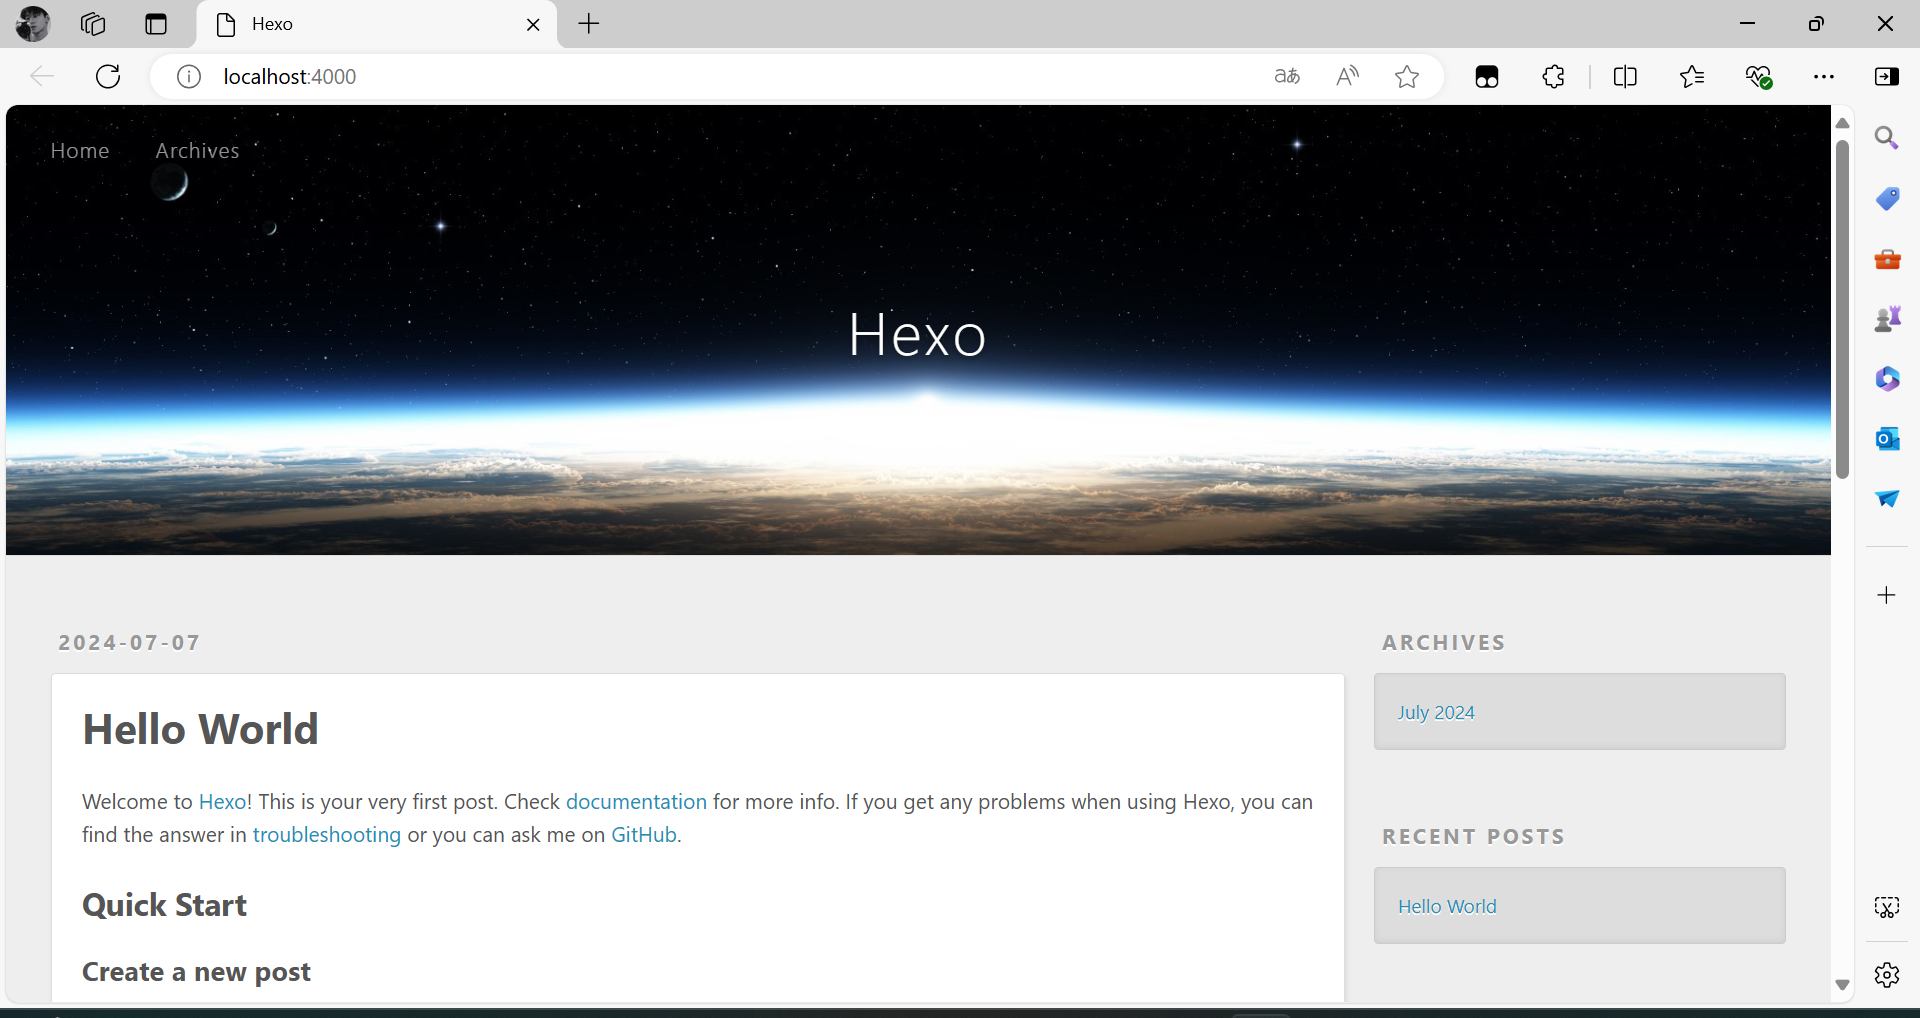
此时,
Hexo已经部署完成
五、GitHub
通过Github相应配置,即可将其部署到Github上(其他设备输入你的博客地址,即可查看你发布的文章)
注册
Github账号GitHub注册地址Github-signupGithub SSH免密码配置初始化用户名和邮箱
打开终端(
Win+R键,输入cmd)或者终端管理员命令行页面,执行命令格式git config --global user.name "name"和git config --global user.email "email"1
2git config --global user.name "name"
git config --global user.email "email"注意:这里的
name输入你的GitHub用户名,email输入你的GitHub邮箱博主
GitHub用户名Zglao,GitHub的邮箱3878XX6714@qq.com,初始化用户名和邮箱,执行命令git config --global user.name "Zglao"和git config --global user.email "3878XX6714@qq.com"1
2PS C:\Users\20538> git config --global user.name "Zglao"
PS C:\Users\20538> git config --global user.email "3878XX6714@qq.com"生成密钥
打开终端(
Win+R键,输入cmd)或者终端管理员命令行页面,执行命令ssh-keygen -t rsa -C "3878XX6714@qq.com",需要按Enter键回车三次1
2
3
4
5
6
7
8
9
10
11
12
13
14
15
16
17
18
19
20
21
22PS C:\Users\20538> ssh-keygen -t rsa -C "3878XX6714@qq.com"
Generating public/private rsa key pair.
Enter file in which to save the key (C:\Users\20538/.ssh/id_rsa):
Created directory 'C:\\Users\\20538/.ssh'.
Enter passphrase (empty for no passphrase):
Enter same passphrase again:
Your identification has been saved in C:\Users\20538/.ssh/id_rsa
Your public key has been saved in C:\Users\20538/.ssh/id_rsa.pub
The key fingerprint is:
SHA256:MZ5Yd1Gt1iJJ5z3l4DEfN1patptTv4A8swcN2+1Y5v0 3878XX6714@qq.com
The key's randomart image is:
+---[RSA 3072]----+
| .... |
| ..=*+|
| + ...=*X*|
| + = ooo*o*|
| . S . *o..*|
| B + B.|
| = B +|
| . o +.|
| . E|
+----[SHA256]-----+上述操作会在
C:\Users\20538路径下生成.ssh的文件夹,其中有一个id_rsa命名的文件是私钥,带.pub扩展名的文件是公钥Github创建ssh密钥登陆到
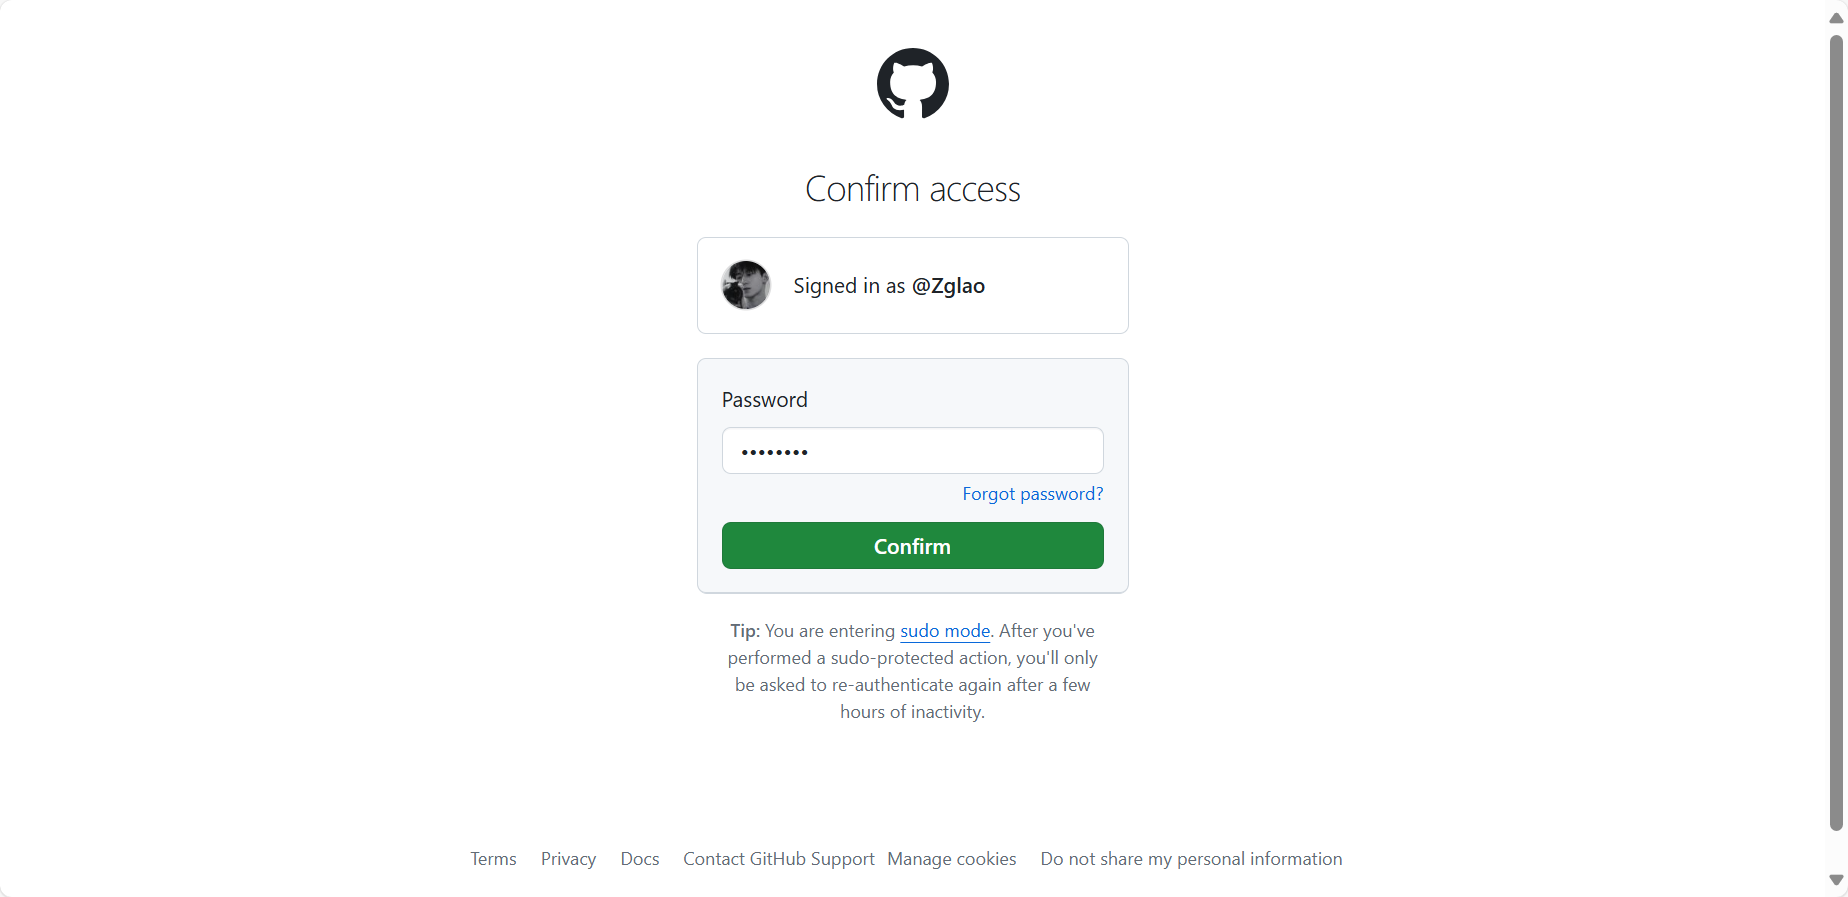
GitHub,操作步骤:右上角小头像->Setting->SSH and GPG keys,点击new SSH key,系统会提示Cofirm access(确认访问),输入Github密码点击Confim,就可实现SSH免密码访问
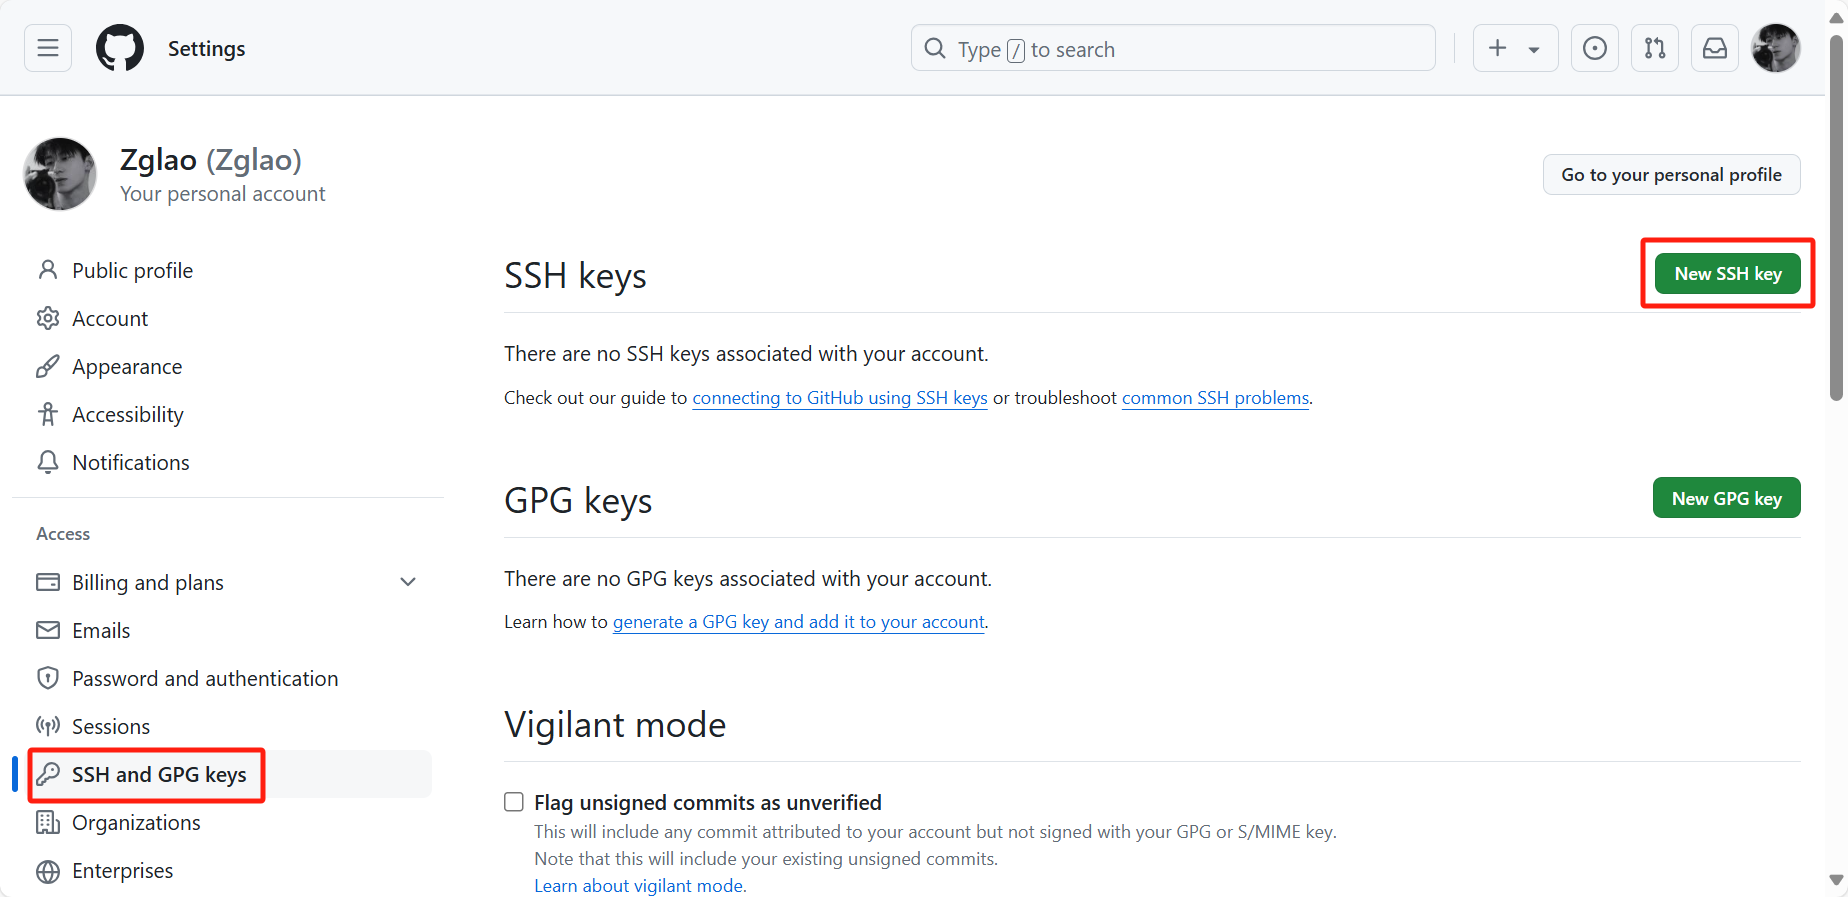
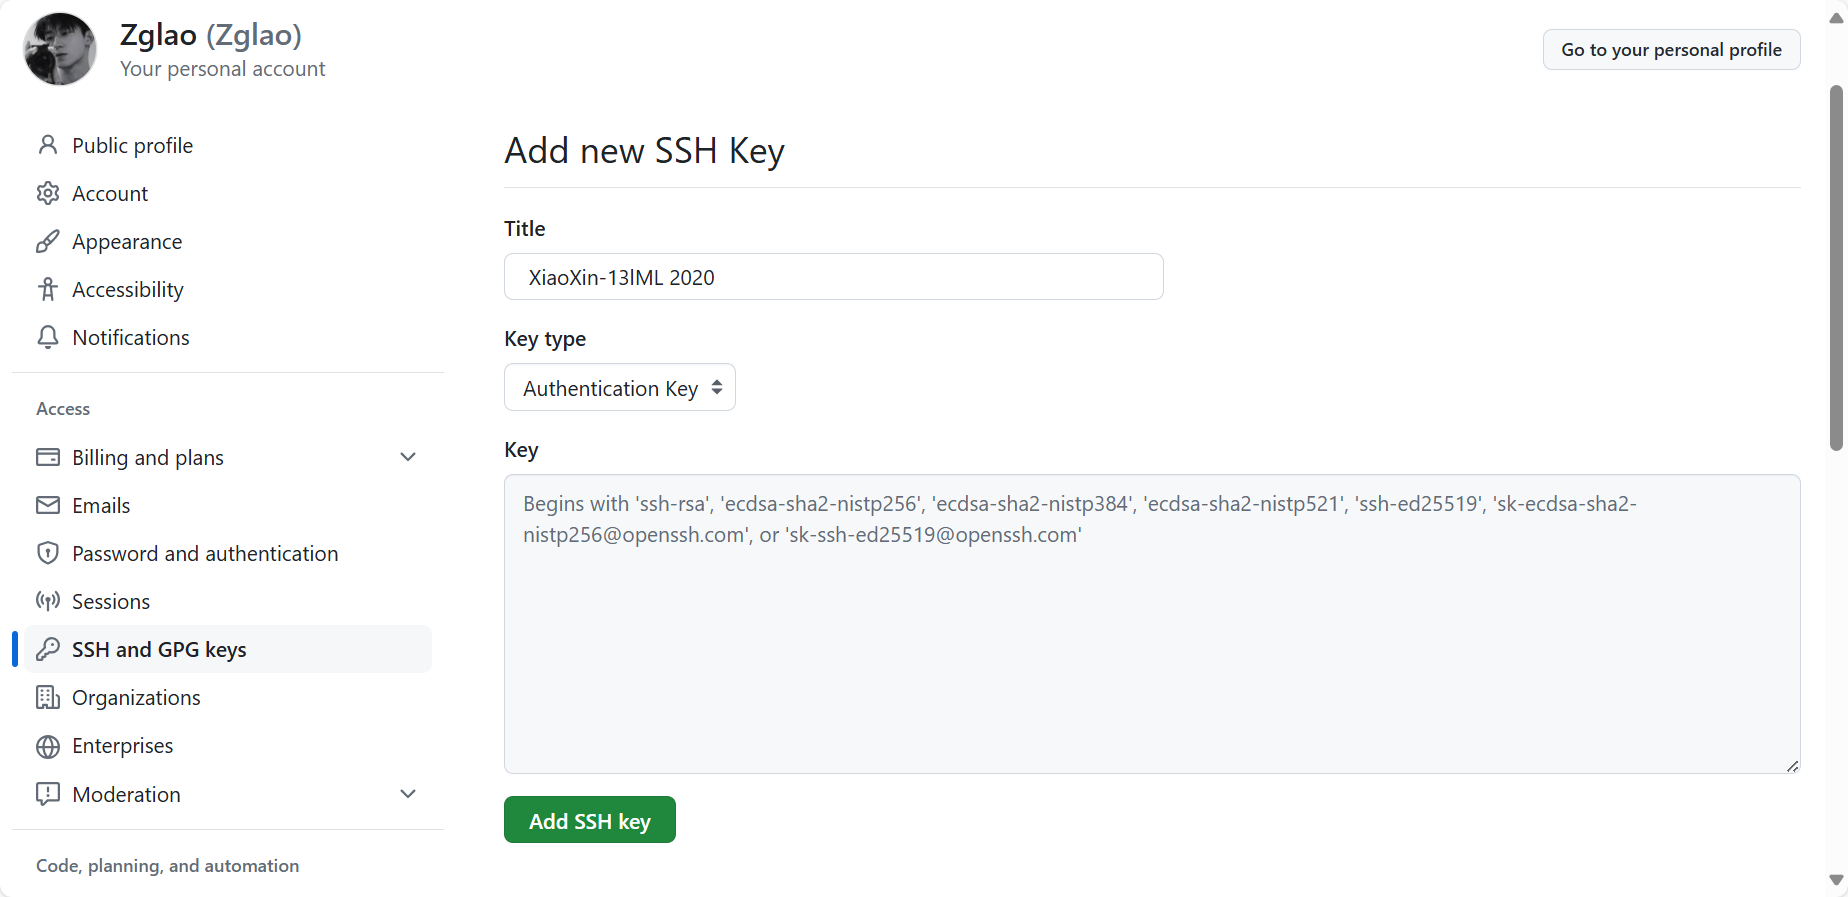
其中,
Title可以随便填写,最好能让自己知道这个公钥是哪个设备,key把生成的.pub文件中的所有内容复制粘贴进去验证
ssh连接是否成功打开终端(
Win+R键,输入cmd)或者终端管理员命令行页面,执行命令ssh -T git@github.com,提示Are you sure you want to continue connecting (yes/no/[fingerprint])?(您确定要继续连接吗(是/否/[指纹])?)需要手动输入yes1
2
3
4
5
6
7PS C:\Users\20538> ssh -T git@github.com
The authenticity of host 'github.com (20.205.243.166)' can't be established.
ED25519 key fingerprint is SHA256:+DiY3wvvV6TuJJhbpZisF/zLDA0zPMSvHdkr4UvCOqU.
This key is not known by any other names
Are you sure you want to continue connecting (yes/no/[fingerprint])? yes
Warning: Permanently added 'github.com' (ED25519) to the list of known hosts.
Hi Zglao! You've successfully authenticated, but GitHub does not provide shell access.出现用户名(
Hi Zglao!),博主用户名Zglao,代表访问成功,上述操作之后会在C:\Users\20538路径下生成.ssh的文件夹,其中有一个known_hosts命名的文件是用于存储SSH客户端已知的服务器公钥,known_hosts.old命名的文件是known_host文件的一个备份,目的是防止意外删除或修改known_hosts文件,导致无法验证之前连接过的服务器
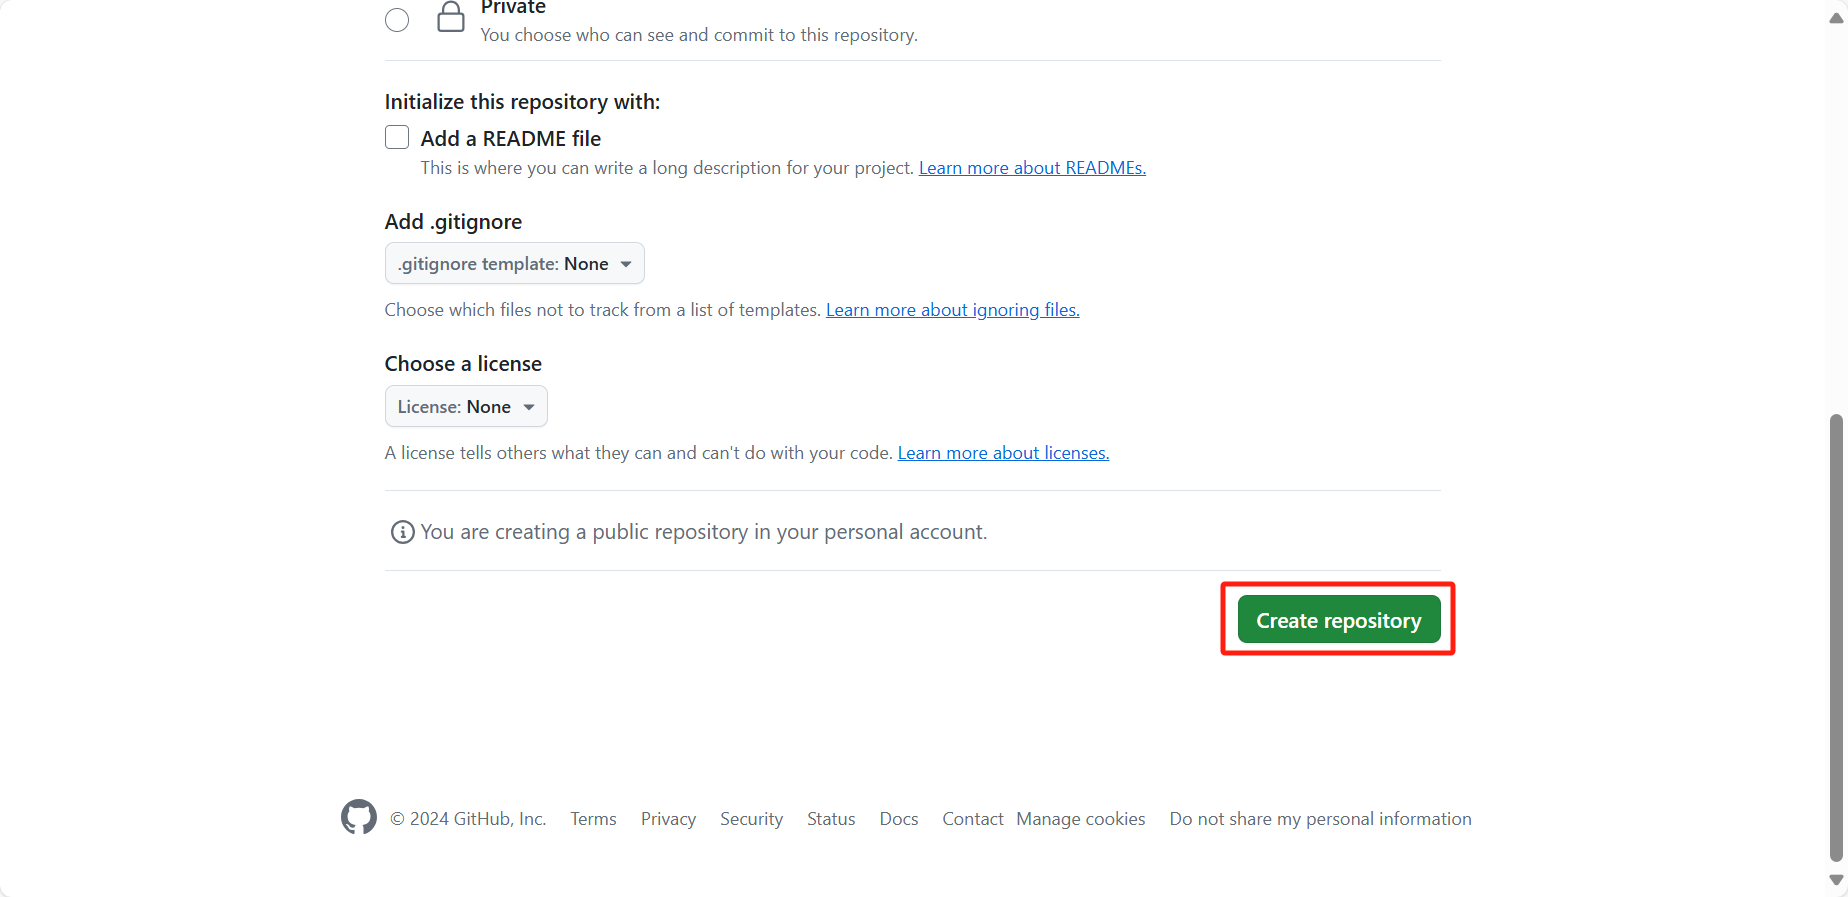
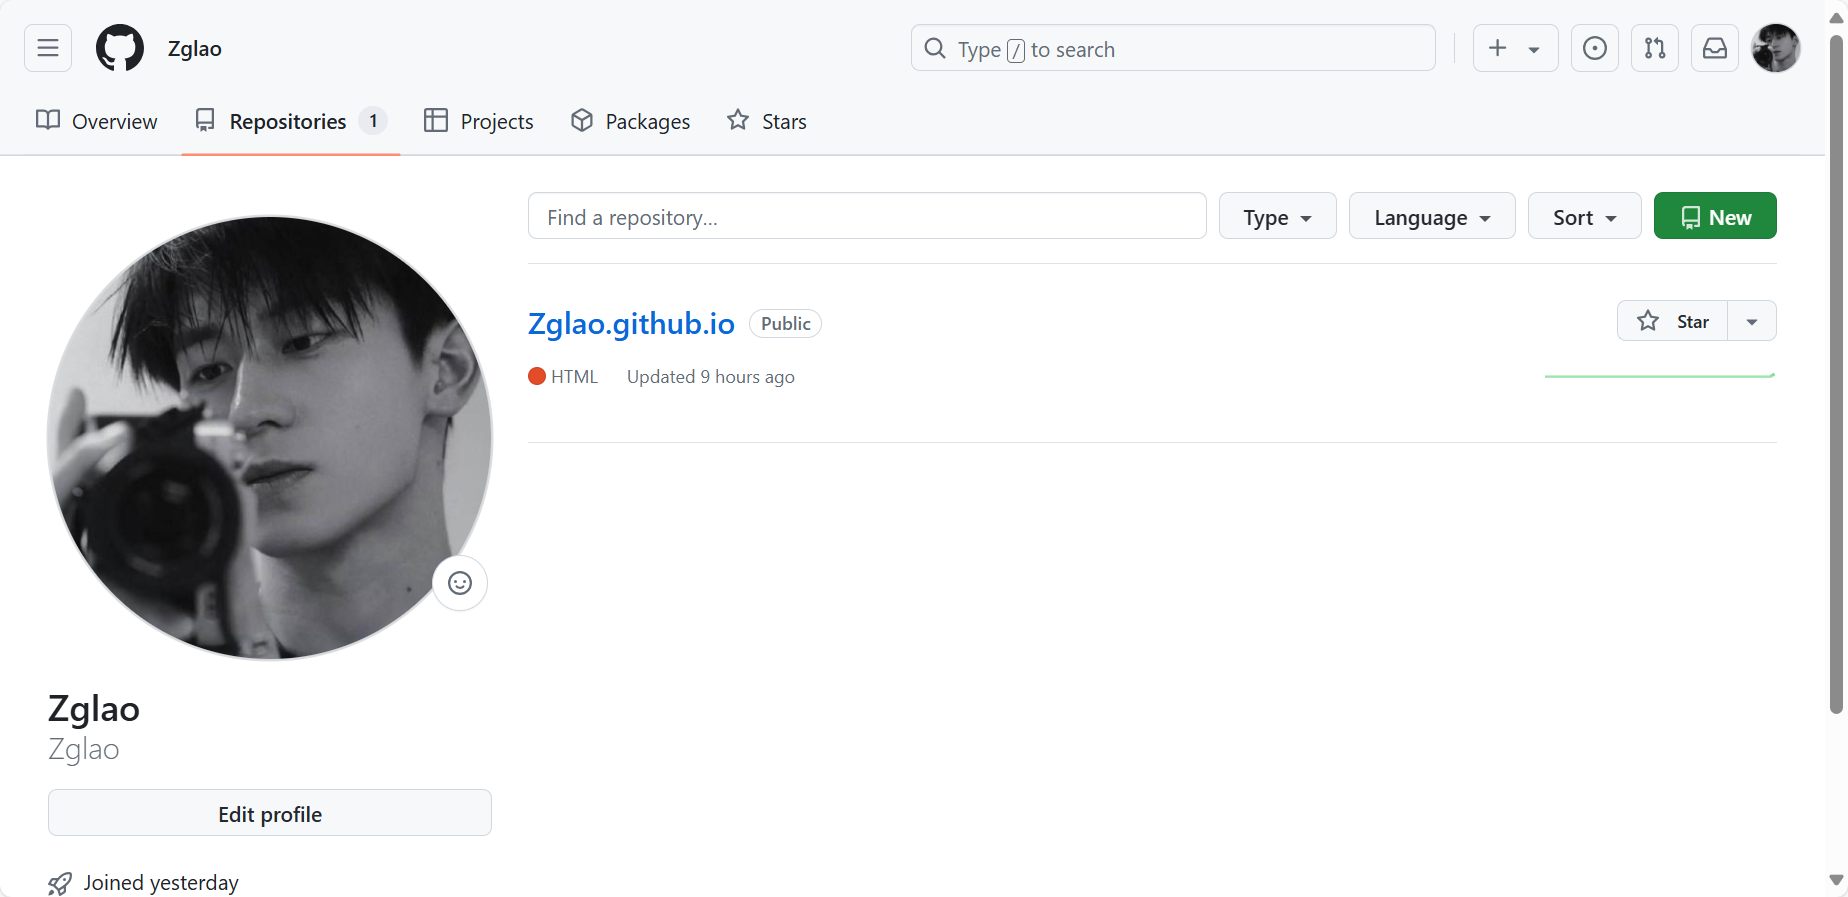
Github远程仓库配置创建仓库
仓库名格式
GitHub用户名.github.io(博主仓库名是Zglao.github.io),仓库类型选择Public,其他内容默认,点击Create repository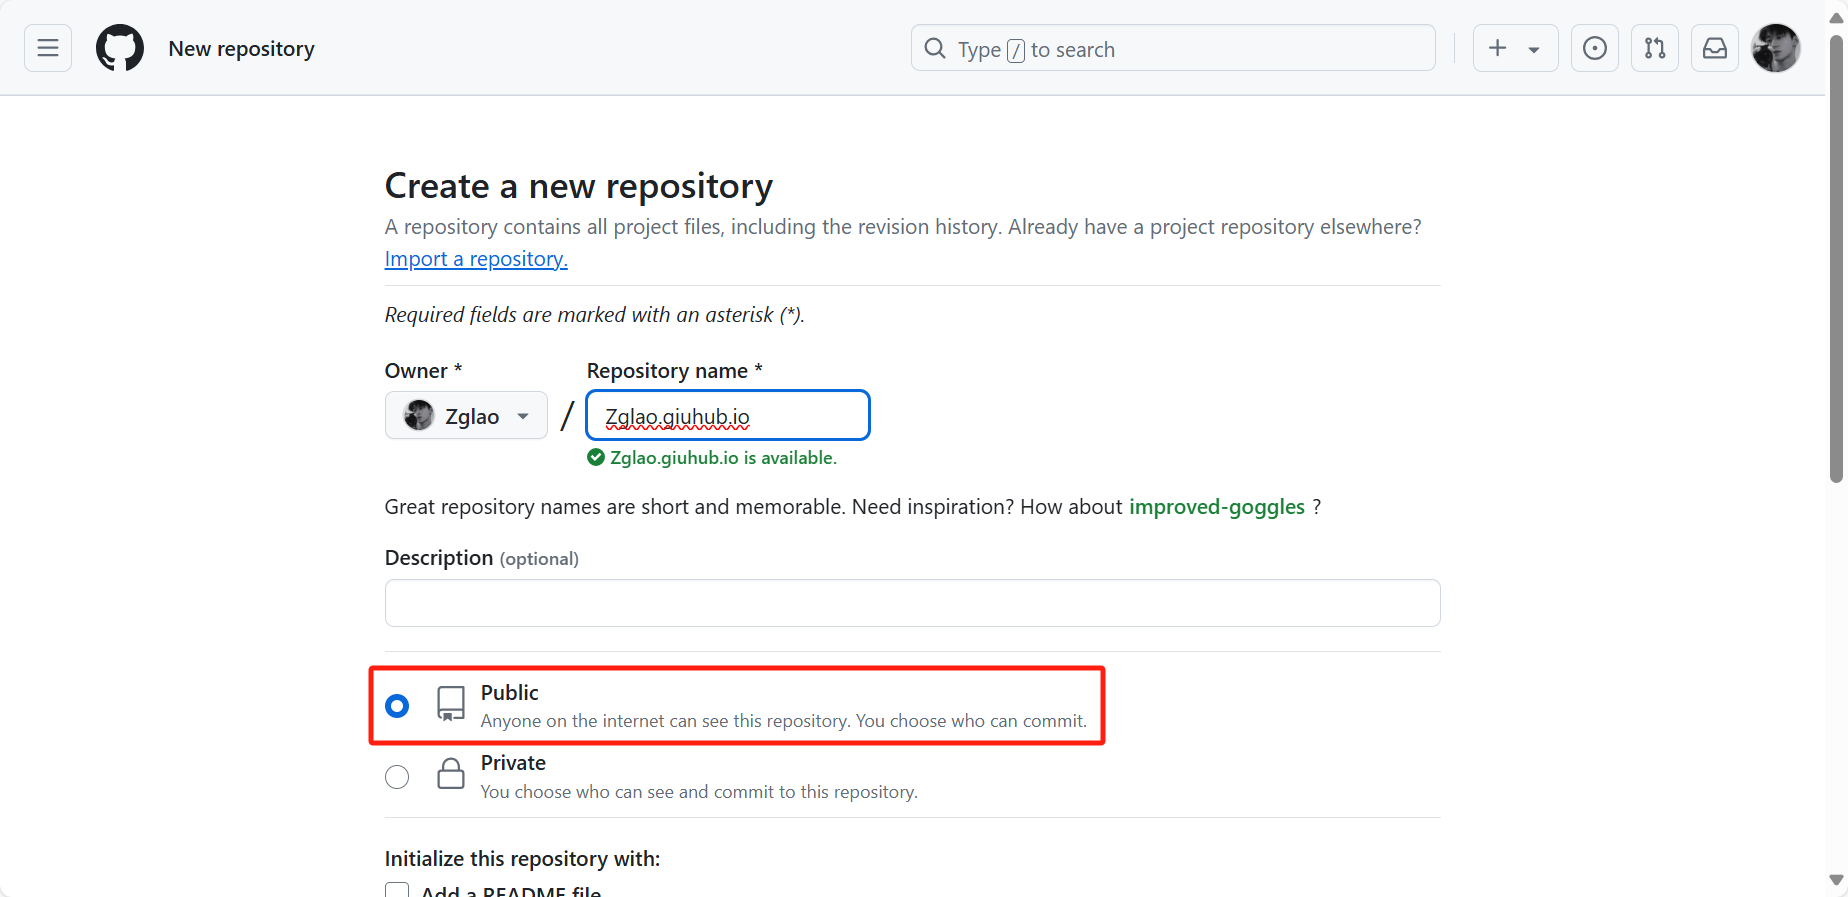
安装
hexo部署插件打开终端管理员命令行页面,进入
D:\Blog路径,执行命令npm install hexo-deployer-git --save,安装hexo部署插件1
2
3
4
5
6
7PS C:\Users\20538> cd D:\Blog
PS D:\Blog> npm install hexo-deployer-git --save
added 10 packages in 3s
29 packages are looking for funding
run `npm fund` for details配置
_comfig.yml文件_comfig.yml文件路径在D:\Blog,_comfig.yml文件用记事本打开,文件最下面1
2
3
4# Deployment
## Docs: https://hexo.io/docs/one-command-deployment
deploy:
type: ''修改为
1
2
3
4
5
6# Deployment
## Docs: https://hexo.io/docs/one-command-deployment
deploy:
type: git
repository: git@github.com:name/name.github.io.git
branch: master注意:这里的
name为用户名,name.github.io为仓库名博主
GitHub仓库名是Zglao/Zglao.github.io,配置_comfig.yml文件该部分内容修改为1
2
3
4
5
6# Deployment
## Docs: https://hexo.io/docs/one-command-deployment
deploy:
type: git
repository: git@github.com:Zglao/Zglao.github.io.git
branch: master部署到
Github桌面右键打开
Open Git Bash here终端命令行页面,进入D:\Blog路径,执行命令hexo clean && hexo g && hexo d1
2
3
4
5
6
7
8
9
10
11
12
13Zg Lao@admin MINGW64 ~/Desktop
$ cd D:\Blog
Zg Lao@admin MINGW64 /d/Blog
$ hexo clean && hexo g && hexo d
INFO Validating config
INFO Deleted database.
INFO Deleted public folder.
INFO Validating config
INFO Start processing
INFO Files loaded in 100 ms
...
INFO Deploy done: git其中,命令
hexo clean是清除缓存文件,hexo g或者hexo generate是生成网页文件,hexo d或者hexo deploy是部署网页文件到Github,显示INFO Deploy done: git证明已经部署到Github,此时,可以打开浏览器输入Zglao.github.io进入个人博客